Its belonging to the Japanese technical analysis branch, the hammer pattern surprised the Western world’s technicians with its characteristics. The striking thing about the hammer pattern is that it is formed by only one candlestick. That is it – one single candlestick able to reverse the strongest trends.
Another thing about hammers is that they do not work 100% of the time. In fact, no technical analysis pattern or strategy works every time. Still, the essential part is that it works often enough that the pattern gives great trades when combined with a sound money management strategy.
What is a sound money management strategy? To start with, it is based on acceptable risk-reward ratios. More precisely, a sound money management strategy never accepts a take-profit level that is smaller than twice the risk. In other words, if your risk on any given strategy is one hundred pips, the reward must exceed two hundred pips. The bigger the risk-reward ratio, or the rr ratio as it is also called, the better.
Not all patterns and strategies can give rr ratios bigger than 1:2. The hammer does, and this is one of its more appreciated qualities. Sometimes, the resulting rr ratio exceeds 1:4 or even more – a ratio is rarely seen trading other patterns.
Another feature of a sound money management strategy is protecting the account by risking only a certain percentage on any trade. Therefore, the higher the rr ratio, the faster the account grows should the pattern or strategy used allow for larger rr ratios. As mentioned already, and as this article will show, the hammer gives such rr ratios.
This article will focus more on the practical aspects of trading the hammer pattern. We will start by explaining what the pattern is and a bit of its historical background, and then we will move on to discussing some examples.
What Is the Hammer Pattern?
The hammer is a reversal pattern. Moreover, it is a bullish reversal pattern that forms at the end of a bullish trend. In other words, without a bearish trend, it should be ignored if a candlestick resembles a hammer.
The hammer belongs to Japanese candlestick patterns introduced to the Western world in the late 90s by the American Steve Nison. Steve studied the patterns first-hand and found that most are reversal patterns. With a few exceptions, Japanese candlestick patterns form at the end of bullish, respectively bearish, trends.
Nison was intrigued by one particular thing displayed by the Japanese candlestick patterns – the time element. More precisely, in sharp contrast with the Western classic technical analysis patterns, the Japanese take far less time to form.
The perfect example here is to have a comparison between, say, the head and shoulders and the hammer. The head and shoulders pattern is also a reversal formation appearing at the end of a bullish trend. Moreover, the bullish pattern, inverse head and shoulders, forms at the end of a bearish trend.
The head and shoulders have various elements (e.g., two shoulders and one head) formed by multiple candlesticks. In contrast, the hammer has only one candlestick. Other Japanese patterns also have far fewer candlesticks – e.g., morning and evening stars have three candlesticks, bullish and bearish engulfing patterns have two candlesticks, the piercing and the dark cloud cover also two, and so on.
All other Western classic patterns have tens of candlesticks, and by the time the market comes close to the end of the pattern, most traders have already noticed it. Because of the increased visibility, they often do not work because the arbitrage opportunity quickly disappears.
The Elements of a Candlestick
Before discussing more about a pattern formed of a single candlestick, let’s define the elements of it. This is not the first time we have done this during this trading academy, and most videos that accompany the articles also use candlestick charts. Therefore, plenty of examples exist.
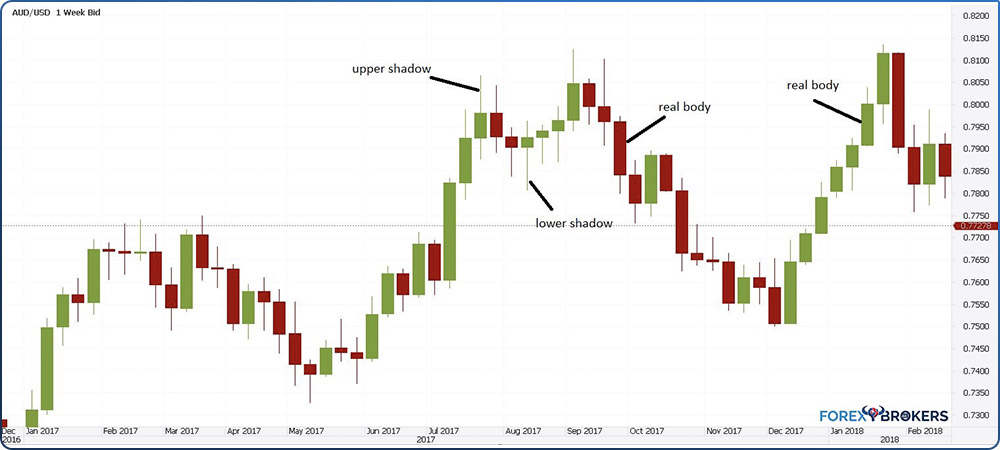
Above, you can see a candlestick chart on the AUDUSD pair. This is the weekly timeframe, meaning each candlestick or period represents one week.
One candlestick has a real body, given by the distance that the market travels from the opening to the closing of the period. Therefore, if the price action is bullish, or the closing price on the week is higher than the opening price, the chart displays a green or bullish, real body. It is said that the bigger the real body, the stronger the implications for the overall trend. The real body can also be bearish or red if the closing price is lower than the opening.
Any candlestick has two shadows, one or none. The shadow is the price action that reaches the extremes before the market reverses. In the above chart, in the first example from the left, the upper shadow represents the bullish price action or the highs that the market made before reversing. In other words, the market reached higher levels than the closing price. Despite the candlestick having a bullish real body, the big upper shadow is actually a bearish sign.
The same is valid for a lower shadow. One candlestick, thus, offers plenty of information about the market’s price action. For example, small or no shadows reveal market strength, and long upper and lower shadows reveal hesitation. In contrast, only one long upper or lower shadow is the strongest signal when reading Japanese candlesticks.
Conditions for a Hammer Pattern
Now that we know what makes a candlestick let’s look at what makes the hammer pattern. As a one-candlestick reversal pattern, the hammer has the following characteristics:
- A long lower shadow.
- A small real body.
- The color of the real body does not matter – it could be green or red.
- A small upper shadow.
But that is not enough. A quick look at the chart above shows multiple candlesticks that respect the conditions for a hammer. However, not all of them are hammers.
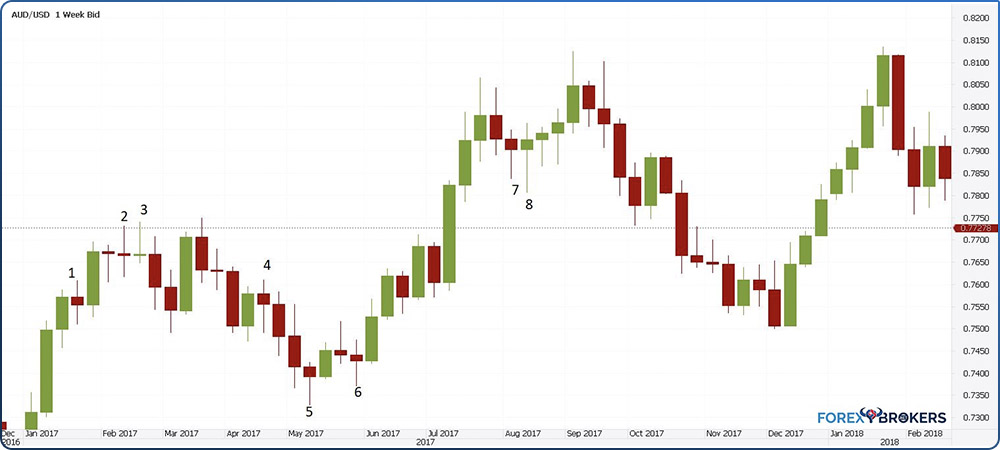
The chart above is the same AUDUSD pair on the weekly timeframe. All eight candlesticks marked on it show a candlestick that respects all the conditions mentioned earlier. However, only one of the eight candlesticks is actually a hammer.
To filter them, we need to add the following conditions that must be in place when looking for a hammer:
- The market must be in a bearish trend.
- The real body must fit in the lower shadow at least twice.
- It is mandatory for the hammer to mark the absolute low in the bearish trend.
Interpreting the Potential Hammer Patterns
Let’s stick with the previous chart. The first four candlesticks are impossible to interpret as hammers for the simple reason that there is no bearish trend in place. Moreover, even if we assume such a trend exists, the other conditions would not exist.
The first example has a real body that does not fit twice into the length of the lower shadow. The second example has a real body that is too small – it resembles a Doji pattern rather than a hammer. We can make a similar argument for the third example. The fourth example resembles the first one. Moreover, the candlestick does not make a new low.
How about the fifth example? This is a true hammer. It marks a new low, it forms at the end of a bearish trend, it has a small real body that fits twice into the length of the lower shadow, and so on. All conditions for a hammer are in place. As for the rest of the examples, I will leave each of you to judge for yourself why it is impossible to consider them as hammer patterns.
Is There a Bearish Hammer Pattern?
It would be strange not to have a bearish pattern similar to the hammer. This is because all reversal patterns that are part of the Japanese candlestick techniques have a counterpart. For example, the piercing pattern is bullish, while the dark-cloud cover is bearish. Or, the bullish engulfing, as the name suggests, is bullish, while the bearish engulfing is, naturally, bearish. Furthermore, the morning star is a bullish pattern, while the counterpart, or the opposite pattern, is the evening star.
Therefore, it would be logical to look for a bearish reversal pattern that respects all the rules of the hammer pattern. Such a pattern does exist and its name is “shooting star.”
A shooting star, thus, forms at the end of bullish patterns. For the market to form a valid shooting star, the following conditions must be in place:
- A rising market.
- The shooting star’s real body must be small and in the lower half of the candlestick.
- A small lower shadow must be present.
- The shooting star has a long enough upper shadow to fit twice the real body.
- The shooting star must make a new high.
- The real body’s color does not matter.
Basically, we have a similar pattern as the hammer, only that, as traders, we would want to short the market after a proper shooting star forms. Just like in the case of the hammer pattern, identifying a proper shooting star is not easy because we have to account for all the factors listed above.
Examples of Potential Shooting Stars on the AUDCHF Weekly Timeframe
Once again, we will use examples to illustrate what a proper shooting star looks like. The AUDCHF weekly timeframe below shows three possible shooting stars. Like when we identified the hammer, we see different possibilities for a shooting star – this time, three scenarios, labeled in the chart below.
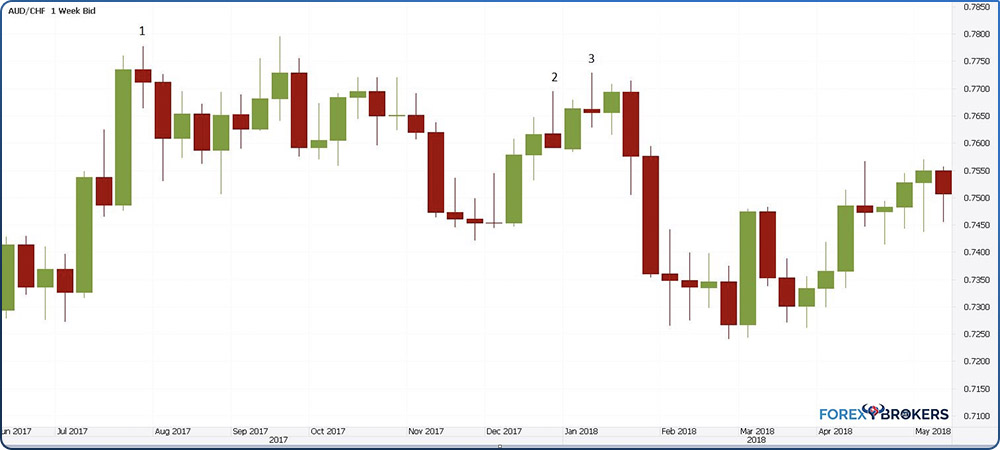
The first example from the left, labeled number 1, reveals a candlestick that might be a shooting star. After all, a bullish trend already exists, and the candlestick makes a new high while having a small real body. However, if we measure the real body and try to fit it twice into the upper shadow, we see that this condition is not satisfied. Hence, this is not a shooting star.
Moving forward to the second example, labeled number 2 on the earlier chart, we see a bullish trend, albeit a small one. However, we may give it a shot because this is the weekly pattern. This time, the real body does fit twice into the upper shadow. Moreover, the market made a new high at the close of the candlestick. Nevertheless, no lower shadow is present, which is a mandatory condition during a shooting star’s formation. Therefore, we can easily discard this candlestick as not good enough for a shooting star.
Finally, the third example, labeled number 3 on the chart above, shows a valid shooting star. The body is small enough to fit twice into the upper shadow and a small lower shadow does exist. Moreover, the candlestick makes a new high. Furthermore, the real body is not small enough for the candlestick to be considered a Doji, so the rules for a shooting star are satisfied.
How to Trade the Hammer Pattern
Now that we have seen the rules for a hammer and its equivalent, a shooting star, let’s have a look at some strategies on how to trade the pattern. Before starting, you might want to consider what was said at the beginning of this article – hammers are patterns leading to one of the biggest risk-reward ratios in technical analysis. Therefore, there is a strong interest in identifying the right strategy to use when trading hammers.
The first condition, valid in almost all trading strategies, is waiting for the candlestick to close. Sometimes, this can be painful.
Consider the hammer examples shown so far in this article. They came from the weekly timeframe. Trading in anticipation of the closing of the trading week is dangerous because the market may turn. Therefore, just like when trading with the Relative Strength Index (RSI) or other oscillators, waiting for the hammer candlestick to close is vital.
Another condition is to avoid trading even if the hammer candlestick is closed. How come? The explanation is very simple – the hammer shows an ongoing battle between bulls and bears. Bears are in control, and bulls try to overcome the market, but it is unlikely that the bearish interest will disappear suddenly. As such, the market, most of the time, pulls back into the hammer’s price action territory.
In fact, savvy traders avoid trading a potential hammer if there is no pullback in the future price action. Therefore, we should wait for the hammer to close and then wait some more for the market to return to the desired entry place. These are mandatory conditions to reach a proper setup that results in a risk-reward ratio in excess of 1:3 or even more.
Setting Up the Trading Strategy – Rules to Follow
It is time now to set the rules for trading the hammer pattern. First, we want to ensure that the candlestick we’re looking at is a hammer. For this, you may want to check and double-check the rules listed earlier in this article that describe what a hammer should look like.
Second, as mentioned in the earlier section, we must wait for the hammer to close – for the candlestick to close. After all, it is the only way of knowing that the hammer formed.
The third step already involves some action. That is, we should use a Fibonacci retracement tool and measure the full length of the hammer. Effectively, we mark with two horizontal lines the highest and the lowest points in the hammer formation; then, we use a Fibonacci retracement tool to find some important retracement levels. In particular, we are interested in the area between 38.2%-50%-61.8%. Depending on the aggressiveness and risk appetite, some traders find it OK to buy the 38.2% retracement, while others prefer to wait for the 61.8%, at the risk of missing the entry. However, keep in mind that the earlier the entry, the smaller the risk-reward ratio will be.
Fourth, we may want to place a pending order to buy from the desired area. That is a pending buy-limit order. Remember how to use the pending orders? We addressed this subject in a previous article, but here’s a quick reminder. When we want to buy or go long, there are three options: buy at the market or at the current price. Another is to buy from higher levels; the pending buy-stop order helps. Finally, another one is the buy from lower levels when compared to the current market price. In this case, we would need to use a pending buy-limit order.
The last step is to set the parameters for the trade. The stop-loss must be placed at the lowest point in the hammer formation. As for the take-profit, the ideal ratio is 1:4. To determine the exact level, measure the distance from the entry point to the stop loss and project it four times to the upside. By doing so, the take-profit level respects the 1:4 risk-reward ratio.
Trading a Hammer on the AUDUSD Weekly Timeframe
Our first example that illustrates how to use the strategy mentioned above is from the AUDUSD weekly timeframe discussed earlier. We have said that the only candlestick suitable to be a hammer is the one shown below.
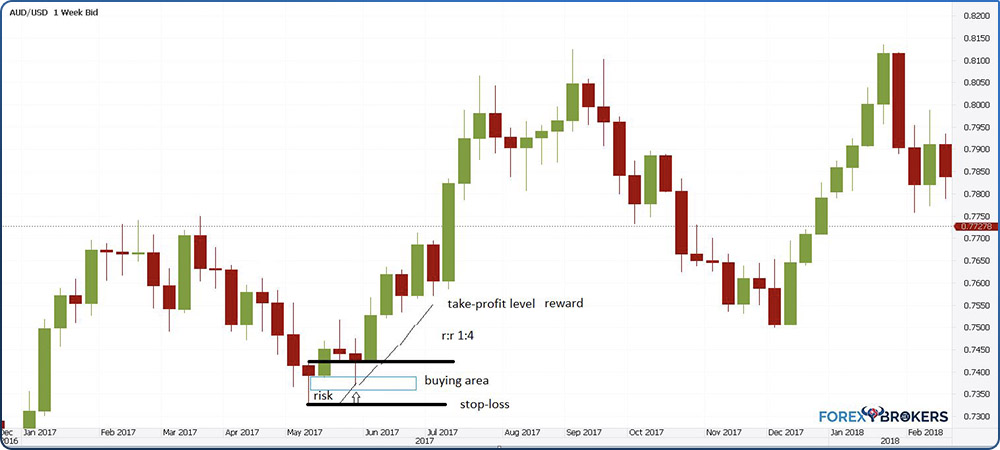
Let’s review the steps in the strategy and how we derived a risk-reward ratio of 1:4. Moreover, still, on this part, we will discuss what other things might have been done to make even more out of this setup.
We notice a bearish trend, and the market forms a hammer at some point. After the candlestick closes, the trader starts the work. This being a weekly timeframe, the technical analysis can be done over the weekend, too, as, according to the strategy, we should wait for a pullback before going long.
Measuring the Range
The process begins with measuring the range of the hammer. That is, measuring the distance from the highest to the lowest point. Careful here, as this simple step confuses many traders. We want to measure the edges of the hammer, not the real body or the upper shadow – all of it.
We could use a Fibonacci retracement tool applied directly to the hammer, but in this case, the risk is that the Fibonacci tool fails to capture the absolute high and low. Therefore, a better way to proceed is to use two horizontal lines to mark the range. Then, using the Fibonacci tool, find out the area mentioned earlier as the desired area to go long.
Because the hammer shows the ongoing battle between bulls and bears, the market must pull back and often exceed the hammer pattern's lowest point. This means that the trader is stopped from the long trade, but that is okay, as it is part of the plan. This is why it is wise to wait for a pullback – so that the resulting risk-reward ratio is big enough to derive a risk-reward ratio from it that covers for the eventuality of the market reaching the stop-loss level.
Define the Volume to Trade
We should not leave everything to the technical setup but go all the way with also setting the money management rules for the trade. By doing so, the trader must be aware not only of the risk-reward ratio to use but also of the volume to trade. This topic has been discussed in another part of this academy, but it is worth mentioning here briefly.
First, the trader must decide the risk he is willing to take. From the hammer’s technical perspective, everything is clear – the risk is the distance from the entry point (i.e., the area between the 38.2%-61.8% retracement) and the stop-loss (i.e., the lowest point in the hammer formation). On top of that, the trader must decide how much, percentage-wise, to risk on any given trade (e.g., 1%, 2%, etc.).
The next step is to effectively count the number of pips from the entry to the stop-loss level. Remember that the entry uses a pending order, meaning the level is known in advance. Therefore, we can calculate the distance in the number of pips (i.e., the fourth digit in most currency pairs’ quotations).
Finally, the last task is to convert the number of pips into the right volume so that if the worst-case scenario happens (i.e., the stop-loss order being hit), the trading account does not lose more than the intended risk.
Define the Entry Point
We already know the entry point – the area between 38.2% retracement and 61.8%. The trader, actually, has three levels here - 38.2%, 50%, and 61.8%. Because a pending order is used to enter the trade, the trader must decide beforehand what the entry-level would be.
This is an important task because it directly impacts the risk-reward ratio – the ultimate tool for money management. For example, if the trader places the entry-level at 38.2%, the risk is bigger, so the risk-reward ratio shrinks accordingly. On the other hand, by waiting patiently for the 61.8% retracement level, at the risk of missing some important trades, the risk for the trade is smaller, but the risk-reward ratio is higher.
EURGBP Weekly Chart – Trading the Hammer Setup
Let’s consider another example: a hammer pattern on the EURGBP weekly timeframe. This is still a big timeframe, big enough to allow traders plenty of time to spot the pattern, do all the technical analysis steps, and be ready by the time the market opens next Monday.
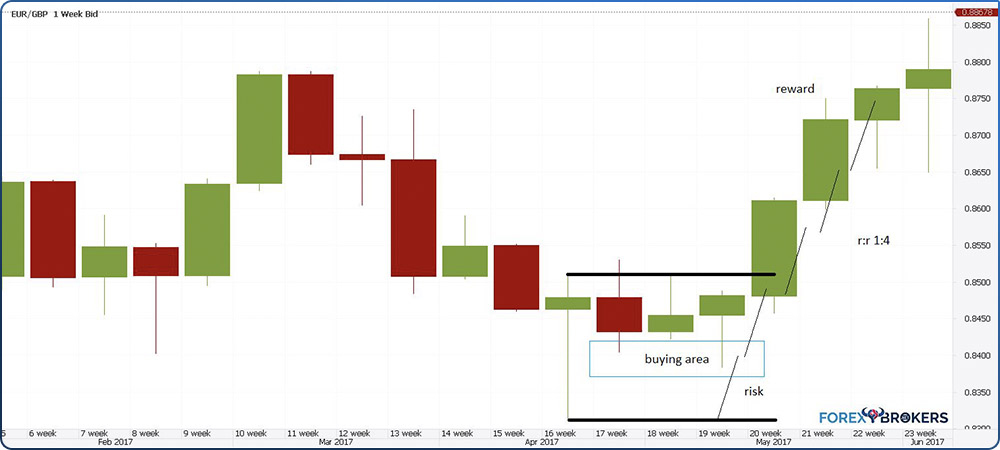
We see the conditions are in place for a hammer. A bearish trend has been in place for several weeks now, and a candlestick makes a new lower low and, at the same time, forms a long lower shadow. The small real body fits more than twice in the lower shadow, fueling the expectations of a hammer. The upper shadow, albeit small, confirms the pattern. The next thing to do is start the measurement process to determine the entry-level.
Using two horizontal lines, we can define the range of the hammer pattern. Note that the price dips into the buying area from the first candlestick following the hammer. More precisely, the following week, the market already dipped to 38.2%. It would have been filled if the trader had had the pending at that level.
However, the market fails to rally. It took two more weeks before it reached 50% and 61.8% before breaking higher. Again, make sure as a trader that you understand the importance of the timeframe as, if it is a big one like in our example, it requires plenty of patience. Also, it requires additional costs because holding a long position on the EURGBP cross pair pays a negative swap, meaning that the broker will deduct the swap from the trading account's equity.
We calculate the risk by measuring the distance from the entry place to the stop-loss level. The final step is to project the risk four times to the upside from the entry level to determine the take-profit level corresponding to a risk-reward ratio of 1:4.
Alternative Trading Strategies to Make the Most of the Hammer Pattern
We have looked at two examples of how to trade the hammer pattern – one on the AUDUSD pair, a major pair, and one on the EURGBP, a cross pair. As observed, there is no difference between the two markets. Also, the hammer trading strategy presented here works on any candlestick chart.
Based on the presented strategy, some alternatives exist for how to make the most of it. Remember that the risk appetite differs from trader to trader, so not everyone is comfortable using the same degree of risk. Therefore, there are some alternatives, as presented below.
Trailing the Stop-Loss Order
One way to protect profits as the market advances after filling the pending order is to trail the stop-loss order. Trailing refers to the trader’s decision to raise the stop-loss order as the market advances.
Different ways of doing so also exist, but the most common way is to wait for the market to travel the risk at once and then raise the stop to break even. This way, even if the market reverses, the trader’s account does not take any loss.
The downside here is that the market often pulls back without taking the original stop-loss level but dips enough to take the stop that was just raised at break-even. Hence, some traders may find that the opportunity cost of letting that happen is too much for such a strategy.
Target Twice the Length of the Hammer
A different, more conservative approach is to use the entire length of the hammer pattern as an instrument for setting the take-profit level. More precisely, the entry strategy remains the same, as explained in this article.
However, for the take-profit level, conservative traders measure the length of the hammer and project that distance twice from the upper edge of the hammer. This way, the risk-reward ratio is 1:2.5 because the entry-level was somewhere at half the distance between the highest and the lowest points of the hammer.
While the risk-reward ratio is not that big, it often pays to use this alternative strategy because sometimes the market fails to travel all the way to an rr ratio of 1:4. Therefore, conservative traders settle for a smaller profit and, should the market come back into the entry area, they have the chance of buying the pair again.
Wait for the Price to Close Above the Hammer’s Range Before Going Long
Yet another alternative way of using the hammer trading strategy is even more conservative. This time, some conservative traders skip the entry altogether. More precisely, they prefer not to place a pending order and adopt a wait-and-see stance.
Effectively, it means that they wait for the market to make the dip into the buying area but prefer to do nothing. As some examples in this article revealed, the market may take some time to consolidate inside the range of the hammer. To avoid blocking the margin in a trade that may consolidate for some time, conservative traders prefer to wait for the market to reach the buying area and then for the price to break higher above the highest point in the hammer’s candlestick.
But not even that is enough. A true breakout happens only if the market closes one candlestick above the highest point in the hammer’s formation.
Naturally, this reduces the risk-reward ratio, but it also reduces the chances of going stopped. If the market is strong enough to bounce from the buying area and close above the highest point in the hammer’s formation, it means that the bulls resisted the bears’ attack and now the bullish trend may start. In this case, a risk-reward ratio of 1:2 is recommended, and the chances of survival for such a trade are much better than the ones using the original 1:4 setup.
Conclusion
The hammer is part of the Japanese candlestick pattern, which is a one-candlestick formation that appears at the end of a bearish trend. To many traders, it is inconceivable that one single candlestick is responsible for such good trades, especially considering the resulting risk-reward ratios.
Everything discussed in this article regarding the hammer pattern can be applied, in reverse, to the shooting star pattern. The only difference is that instead of going long, the setup in the case of a shooting star requires a short trade.
Hammers do not form that often. A candlestick chart is full of candlesticks that resemble a hammer, but on a close look, many of them fail to respect all the rules.
Fortunately, the FX market provides multiple currency pairs and timeframes, so there is always a hammer to trade somewhere. If we add here the other markets accessible from a trading account, like precious metals or indices CFDs, we have a full spectrum of the possibilities in front of a trader.
Just like in the case of support and resistance, the timeframe matters. The bigger the timeframe, the stronger the support and resistance levels provided. This rule is also valid in the case of the hammer pattern – the bigger the timeframe, the bigger the chance that the hammer will survive.
The hammer is mostly appreciated for the big risk-reward ratios that it provides. However, the fact that it takes only one candlestick to form the pattern is another characteristic that makes the hammer a valuable pattern in every trader’s arsenal. No other patterns with similar attributes exist except for the Doji candlestick. But then again, the Doji candlestick also acts as a continuation pattern, so we may claim that the hammer remains the one and only Japanese pattern that takes the shortest time to form – one single period or candlestick.
Check out our video about the Hammer pattern:
