LISTEN TO THIS ARTICLE:
Developed by John Bollinger, Bollinger Bands quickly became popular in the trading community. Mostly used for its capabilities of showing trending conditions, it has different uses too.
The three bands that make up the indicator are the source of many trading strategies and trading algorithms. The way the price reacts on the extremes is fascinating, to say the least, and traders from all parts of the world have tried to integrate the indicator into their trading style.
Besides showing trending conditions, the Bollinger Bands indicator has another important feature—it reflects the volatility of a currency pair and warns traders in advance about a possible breakout. Therefore, we can say that the Bollinger Bands, besides being used as a trend indicator, is also a volatility indicator.
Many trading strategies exist. Perhaps some of the trending strategies to be presented in this article are always familiar, but the volatility strategy surely brings an element of surprise to the retail trader.
As a trend indicator, it appears on the main chart window. The three bands that make up the indicator contain the price action for more than 90% of the time, and, more importantly, they do not repaint.
Repainting refers to the ability of an indicator to change past values based on what the current price shows. Needless to say, indicators that repaint are useless in technical analysis, especially when traders look back in time to test a setup using historical prices.
This article covers the history of the Bollinger Bands indicator, how it calculates its values, and the standard ways of interpreting the market with it. Moreover, it will discuss the volatility component of the Bollinger Bands indicator and why it matters greatly for currency traders expecting a breakout from tight ranges.
Bollinger Bands—The Birth of a Powerful Indicator
In the early 1980s, John Bollinger developed a unique indicator for those times. Back in those days, the currency market was in its incipient phases as main fiat currencies began free-floating only recently. The gold standard in place for many decades has been ditched by the United States in the 1970s, leaving the USD as the world’s reserve currency.
Technical analysis already had a big following, especially in the United States. Major trading theories had already captured the imagination of generations of traders—Elliott, Gartley, Gann, and so on.
Because mainly institutional traders had access to the foreign exchange market (due to expensive fees), most technical analysis breakthroughs and innovations were based on other markets—commodities or stock market. The fact that survived to this day tells us that solid technical concepts stand the test of time regardless of the market to interpret.
John Bollinger had a different view of volatility from the consensus. At the time, volatility was considered static. However, John believed that in fact, volatility is a dynamic element. The bands he developed answer a fairly simple question—on a relative basis, are prices high or low?
Fast-forward several decades, and the Bollinger Bands indicator is part of every trading platform in the world. As this article shows, Bollinger Bands has both a trending and a volatility component. Moreover, different strategies with the Bollinger Bands indicator yield results on various time frames—from the bigger to the smaller ones. As with all technical analysis articles in this trading academy, the focus sits on practical examples. For a full understanding of all concepts covered, the video analyses complement all the information presented.
Bollinger Bands Elements
The concepts of bands or channels following the price action were not new at the time John Bollinger developed his bands. In 1960, Wilfrid Ledoux connected monthly highs and lows on the Dow Jones Industrial Average (DJIA) to come up with a trading band original concept.
Chester Keltner, the father of what we know today as the Keltner bands, used a 10-day moving average rule for the bands to closely follow the price. J. M. Hurst, known for its famous cycles to interpret the markets, developed some sort of envelopes that followed price action.
All these bands that closely followed the price used either recent highs and lows or average true range as adaptive mechanisms—not the Bollinger Bands, though.
Bollinger Bands use something different: a standard deviation that allows its elements, the bands, to adapt to changing market conditions. Most trading platforms list the Bollinger Bands indicator in the trend indicators section, but trending is only one of its uses.
The indicator has three elements or bands. The upper and lower bands contain the price over 95 percent of the time, so we can say that the price of any security or financial instrument evolves between the two bands.
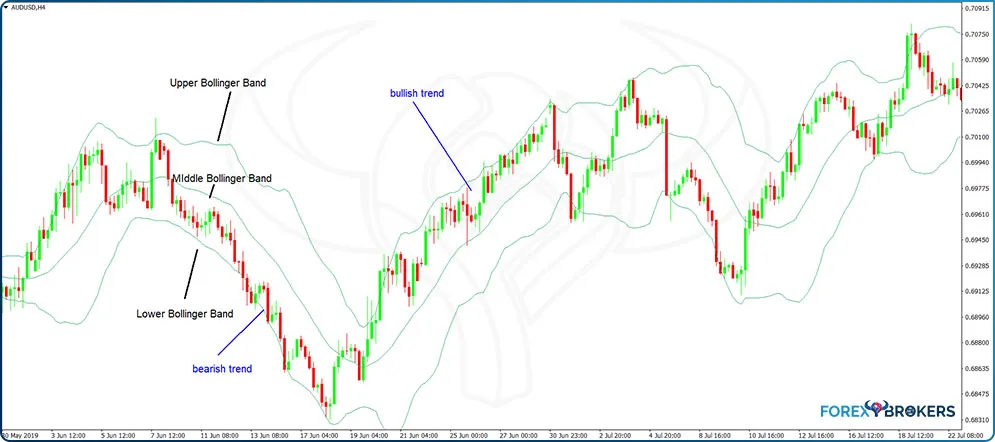
The Upper Bollinger Band (UBB) and the Lower Bollinger Band (LBB) provide a relative definition of high and low, indicating where prices are at extremes. The Middle Bollinger Band (MBB) is a moving average—either simple or exponential.
Most studies nowadays prefer to use an exponential moving average (EMA) for the MBB, simply because the EMA follows the price closely and better defines the underlying trend.
The MBB, in combination with the UBB and LBB, are valuable tools to ride a trend. However, different strategies, other than trending ones, use only the UBB and LBB extremes to point out potential market reversals.
Bollinger Bands Formula
A quick look at the Bollinger Bands indicator settings reveals only two elements that one can edit—number of periods and deviations. The shift option refers to the possibility of shifting the bands ahead or before the current price with a number of periods—not something we want to do so as not to alter the original interpretation.

Obviously, the number of periods refers to the number of candlesticks on a chart that the bands will consider; 20 is the standard one, but traders can change it as they wish. However, by changing it, the Bollinger Bands indicator loses its original meaning, and the interpretation becomes a custom one. In the end, it depends on the trading style, and it is good to know that traders can edit it as they wish.
The deviations number is far more important. It represents the standard deviation of 2.0, and the bigger the number, the more difficult for the price to reach the UBB or LBB. Of course, the opposite is true as well—the lower its value, the easier is for the price to break the UBB or LBB.
The Bollinger Bands formula calculation begins with the MBB, which is the 20-day simple moving average (SMA). A quick note here—not all trading platforms allow you to switch from an SMA to an EMA, so we will just use the SMA in this article as the MBB of the Bollinger Bands indicator.
For the UBB, on top of the MBB, the indicator adds two times the 20-day standard deviation of price. In other words,
UBB = MBB + (2*20-day standard deviation)
The opposite is true for the LBB:
LBB = MBB—(2*20-day standard deviation)
Trading Strategies
It becomes clear now how important the MBB is in the overall Bollinger Bands formula. For example, if we change the method of calculating the MBB, by applying it to the opening price instead of the close price, the entire Bollinger Bands channel changes because the UBB and LBB both have values derived from the MBB.
The standard interpretation of the Bollinger Bands indicator is that traders should react based on the assumption that the price spends most of the time between UBB and LBB—that is, traders should sell extremely higher levels (i.e., when the price reaches the UBB) and buy extremely lower levels (i.e., when the price pierces the LBB).
But like in the case of oscillators and overbought and oversold levels, this approach works until it fails. Strong market conditions often cause prices to move sharply outside the UBB and LBB for an extended period. Moreover, the ability of prices to break outside the UBB and LBB range signals strength and trend continuation, not a trend reversal. Furthermore, a break and close outside the UBB, and LBB does not imply a sharp reversal—remember that the bands adjust based on the standard deviation and, if there is no pullback, as is often the case, the bands’ width adapts quickly and contain the price action again.
Interpreting Trending Conditions
The basic information provided by the Bollinger Bands indicator is also the most valuable. It reflects very well trending conditions, leaving no room for hesitation as to what the underlying trend is.
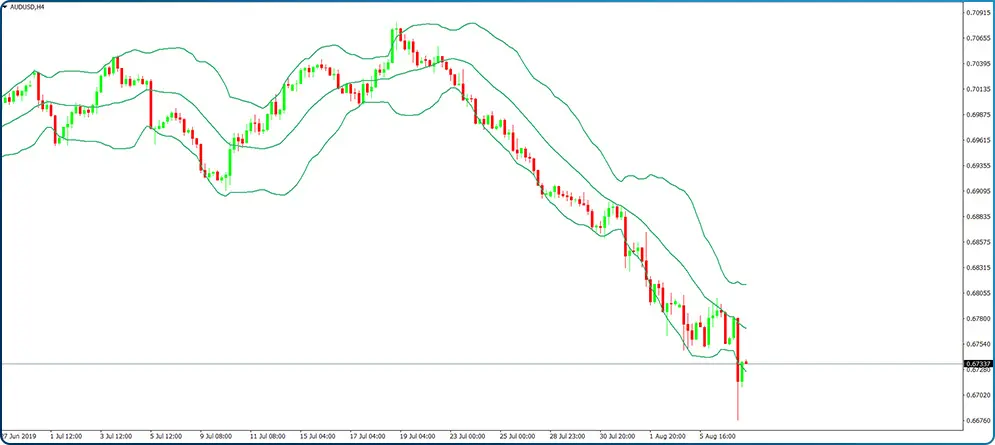
In a bearish trend, the price declines together with the Bollinger Bands. But in a very strong bearish trend, the decline occurs between the MBB and LBB. Furthermore, in super strong bearish trends, the ones with no pullbacks, the price action sees no bounces and is unable to reach the MBB, not to mention the UBB.
The AUDUSD 4h chart above shows bearish price action between the MBB and LBB. The decline is so abrupt that the price cannot reach the MBB on any bounce. Trend traders use such market conditions to run a trend as long as the MBB and LBB contain the price.
The opposite is true as well in the case of a bullish trend. In a bullish market, the three bands that make up the indicator turn to the upside together with the price, containing most of the price action.
When the trending conditions intensify, the price remains between the MBB and UBB. As long as market conditions do not change, trend traders keep their positions and try to look for other patterns to add to the underlying trend.
Bullish or Bearish Trend
A trend is a trader’s friend. Because of any trend, bullish or bearish, has its pullbacks or dips, to maximize them, traders buy such pullbacks or sell such dips to increase exposure. They use them to add to the current position.
Keep in mind that the MBB is nothing but an SMA considering the previous 20 periods. However, the ability of prices to remain above or below it, and between the SMA and the UBB or LBB, shows steady trending conditions.
Regardless of time frame, to add to an existing trend, bullish or bearish, look for the price to develop continuation patterns. The most popular and efficient, in this case, are the so-called “two-with-two” and “one candlestick” trend continuation patterns.
The two-with-two (2w2) formation pattern considers four candlesticks. In a rising market, the 2w2 as a continuation pattern has the first two candlesticks red, or bearish, and the following two green, or bullish. Conversely, in a bearish market, the first two candlesticks are green, or bullish, and the other two are bearish, or red.
Here is an example of the 2w2 formation on a rising market. While the price spends most of the time between the UBB and MBB, traders who want to add to the long side pay attention to what is happening when the price reaches the MBB.
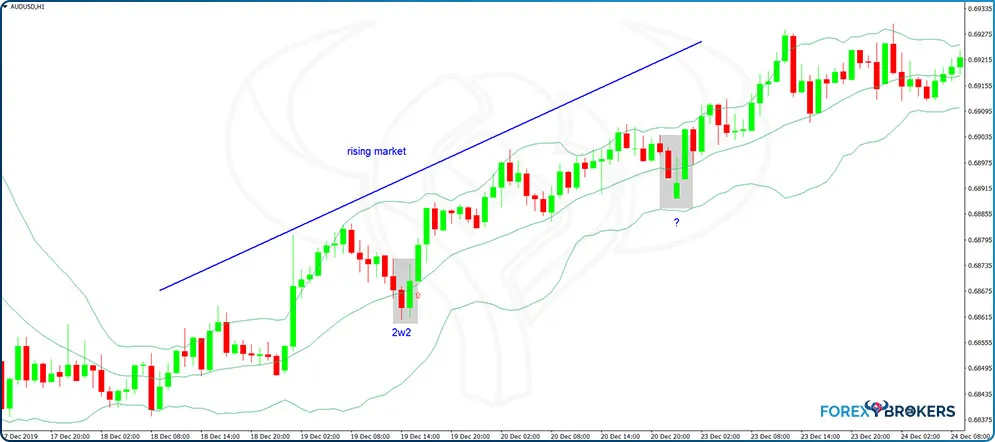
The key to a valid 2w2 formation is that only the two candlesticks in the middle should touch the MBB. More precisely, the second red candlestick and the first green one are the ones allowed to touch the MBB. Otherwise, we should ignore the pattern.
From left to right on the chart above, there is a valid 2w2 formation and one that looks like it, but the third candlestick also touches the MBB line. Because this breaks the rules of the 2w2 formation, we should ignore it.
We should mention here that the 2w2 formations do not appear that often. Even in strong trends, or especially in strong trends, the market has a hard time bouncing or moving lower to reach the MBB. However, when a correct formation appears, it gives a formidable opportunity to add to the main trade.
One Candlestick Validation
An equally important pattern with the Bollinger Bands indicator has only one candlestick that validates or invalidates a trend change. In some cases, it acts as a trend continuation pattern—when the market already moves in a consolidated trend, if the pattern forms in the same direction, it gives the green light to add more to the original position.

The pattern has a precondition, as the chart above shows. Numbers 1 and 2 in blue illustrate the precondition and the one-candlestick trend change confirmation.
First, let us discuss the pattern, or what appears in the gray area. This one candlestick must close below the MBB while opening above it. Moreover, the previous candlesticks should not pierce the MBB at all.
Second, none of this would be valid if the market does not respect the first condition (i.e., what appears labeled 1 with the light-colored circle). This means that the market must first close outside the edges of the Bollinger Bands indicator.
Therefore, for a bearish signal as expressed in the chart above, the market must first break and close outside the UBB. Next, the subsequent price action that follows should not pierce the MBB. Finally, the candlestick that does touch the MBB opens above it and closes below. This is a signal to go short, and it acts both as a trend reversal or as a place to add to the primary market move.
For a bullish signal, look for the opposite. First, one or more candlesticks must close below the LBB. Next, the candlesticks or price action to follow must not pierce the MBB at all. Finally, the signal candlestick should open below the MBB and close above it. This is a signal that a trend has reversed or a signal to add to the same direction as the underlying bullish trend.
An Integrated Trading System
As always, examples help. For this reason, this section of the article shows two examples—one on the silver market and one on the DJIA.
While not currency pairs, the two markets appear in all forex trading platforms. Considering the strong correlation between commodities and commodity currencies (Australian dollar, Canadian dollar), and between U.S. equities and risk-off/on currencies (Japanese yen mainly), the two markets’ volatility has ramifications on the traditional currency market too.
Rules
The system presented here intends to capture most of the market movement using the Bollinger Bands indicator. Keep in mind that the rules and setups presented work on all time frames and all markets, so there is always a market or a setup to trade. It is important to respect the rules and understand this system’s principles.
It all starts with the breakouts. Because the price spends most of its time inside the UBB and LBB, when it manages to break and close above UBB or below LBB, it triggers our attention. Therefore, the first thing to watch for is a close beyond the Bollinger Bands extremes.
Next, the attention shifts to the first time the price crosses the MBB in the opposite direction. If that is a candlestick that respects the rules mentioned earlier on the one-candlestick setup, that is a signal to enter the market.
Moving forward, look for continuation patterns of the main trend. Either 2w2 formations or the one candlestick that this time acts as a confirmation pattern is used to add to the trend. When should it all stop? Most of the time, the exit is given by a similar setup, only this time forming in the opposite direction.
Silver 4h Chart Example
The daily chart below shows the recent silver price action. Also known as the “poor man’s gold,” silver is a proxy to risk, acting in a similar manner with gold. The silver/gold ratio often gives plenty of opportunities to trade market inefficiencies on mispricing between the two.
From left to right, we see silver in a bearish market. Suddenly, one candlestick is strong enough to close below the LBB. This is when the trader pays attention as the possible start of a reversal pattern. Given the time frame, there is plenty of time until the market closes beyond the LBB and the next step in the setup—the MBB crossing.

The next sixteen 4h candlesticks are not strong enough to reach the MBB. However, at one point, the price forms a bullish candlestick that opens below MBB but closes above it. This is a bullish signal, a signal to go long, one that reflects a change in the overall market conditions.
Silver did move higher. It spent a lot of time between the UBB and MBB, confirming the bullish bias. Next, focus on point nr. 3 in the chart above. Is that a valid 2w2 formation? According to the rules, we should skip it because the third candlestick in the pattern also touches the MBB. However, some aggressive traders prefer to take the signal, so in the end, it is up to everyone’s risk profile.
Moving forward, point nr. 4 reveals a pure 2w2 formation—another opportunity to add on the long side. How about point nr. 5? Do we have a bearish reversal?
The answer is no because for such a reversal to exist, the price action prior to the signal candlestick should have closed above the UBB. Because that did not happen, we should ignore the signal. Not surprisingly, the market reversed and posted a new high.
Dow Jones Industrial Average (DJIA) Example
The Dow Jones Industrial Average has been in a bullish trend for quite some time. It took a while to consolidate levels, but the overall trend on the bigger time frames is bullish.
It is always a good idea to trend in the direction of the main trend. Do yourself a favor, and look at the bigger time frames such as monthly or weekly before trading. Moreover, zoom out so that you can see as much of the price action as possible.
A steady, bullish price action that shows higher highs and higher lows on the monthly chart, like in the case of the DJIA, shifts the bias on the long side when trading the lower time frames as well. It means that the chances to win when trading on the long side on the lower time frames are higher than trading on the short side, that is, if we apply the same trading system.
The chart below reveals the impressive run the DJIA in the United States had from about 24,000 to almost 30,000. From left to right, we notice that one candlestick managed to close below the LBB. From this moment on, the attention shifts to the MBB to see if and how the price crosses it.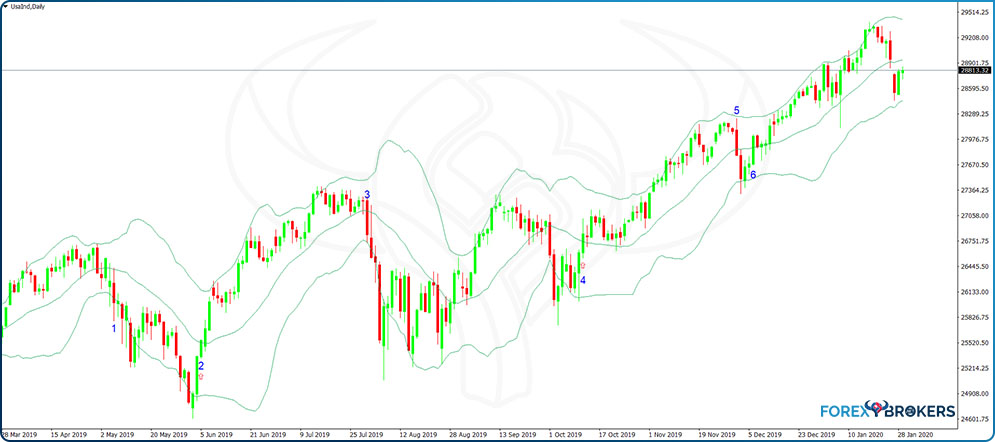
It took a while until that cross came. The market made new lows and managed to close below the MBB multiple times, reinforcing the case of a possible trend reversal.
When the cross comes as clean as it should be, it represents a bullish signal. The DJIA rises about 2,000 points before a candlestick like the one in point nr. 3 manages to close below the MBB. Is this a valid bearish signal? The answer is no.
While the price did close above the UBB prior to the single candlestick’s signal, the candlestick market with nr. 3 is too long—it reaches the LBB, invalidating the bearish entry. If this is not a bearish signal, it means the market remains bullish.
After some consolidation, it began to tick higher. At one point, nr. 4, it offers a clear cross above the MBB, a cross that follows a close below the LBB. This is how the one-candlestick system acts as a continuation pattern instead of a reversal pattern.
So now the system gave the original entry on the long side from around 25,500 and an opportunity to add to that at 26,800. What follows is a bullish price action until point nr. 5, when one candlestick challenges the bullish trend. Is that a valid bearish reversal? This time, the answer is yes.
Before discussing some money management rules to integrate with this system, let us talk about why the nr. 5 point on the earlier chart is a valid signal to close the long trade. The answer lies with the rules presented so far.
The market was strong enough to close above the UBB. Next, it formed a candlestick that opened above the MBB and closed below MBB. That is enough to exit the long side and wait for the next signal, either bullish or bearish. The bullish setup netted 3,000 being long DJIA—2,000 points from the initial entry and another 1,000 on the second entry. How about nr. 6? That is not a valid long entry because the price failed to close below the LBB previously.
As for money management, always have a stop-loss order at the lowest or highest point prior to entry. In the case of a bullish trade, use the previous swing’s lower values as invalidation, or in the case of a bearish trend, use the highest point in the previous market swing prior to the entry level.
Bollinger Bands as a Volatility Indicator
Earlier in this article, it was said that the Bollinger Bands also acts as a volatility indicator. This characteristic is less known by retail traders but very powerful in providing profitable trading setups.
Remember that the two extreme bands that make up the indicator, the UBB and MBB, consider the standard deviation set at 2. The standard deviation typically determines the width of the two bands.
The aim of using the Bollinger Bands as a volatility indicator is to spot breakouts and make the most of the move that follows. To do this, traders must develop a standard, or some measurement of low volatility levels.
Any trader knows that before important breakouts, typically generated by economic releases, the market spends a lot of time in consolidation. The high-frequency trading industry dominates the ranges, as trading algorithms have instructions to sell highs and buy lows until the economic release.
When this happens, volatility dries. As a consequence, the Bollinger Bands that follow the standard deviation of the last 20 periods will have the distance between them shrink considerably. The key is to develop a standard that is neither too wide nor too tight so that breakouts become visible.
Developing a Standard
Before developing a standard, consider that each currency pair has its own average true range (ATR) and volatility levels. As such, the standard deviation of 2 has different values on different currency pairs.
Moreover, the time frame matters as well. A standard built on a currency pair on a the 4h chart will not work on the hourly or daily time frames. Therefore, keep in mind that each currency pair and each time frame has their own standard of measuring volatility before a market breakout.
Several steps help find this standard. If you want, this is a measured move used to find out situations or setups that usually form before a breakout.
First, zoom out on the active time frame to show as many candlesticks as possible on the screen. Next, use the Home tab on your keyboard so that the MetaTrader4 platform goes to the most distant historical price. Make sure to have set the chart in such a way to allow it to shift. As a reminder, you can easily do that by right-clicking anywhere on the chart, selecting Properties, and, under the Common tab, ticking the Chart shift option.
The following step requires finding situations when the distance between UBB and LBB shrank significantly. Do not look for the most extreme case but rather for significant ones relevant to both the currency pair and the time frame.
Trading Volatility Breakouts
Below is an example. This is the EURAUD hourly chart, showing the most recent price action at the time this article was written.

Let us assume that, on average, the standard for measuring volatility is the blue line connecting the two horizontal ones. Based on research on historical prices, this means that every time the distance between UBB and LBB shrinks more than this standard, the volatility falls so much that a breakout is imminent.
To trade the breakout, wait for the Bollinger Bands to widen sufficiently enough so that the distance between the UBB and LBB exceeds the standard by half. This way, we avoid false breakouts.
For instance, in the example above, after the two bands shrank more than the standard, implying a break is imminent, the price closed below the LBB. However, the distance between UBB and LBB was not big enough to justify going short.
Instead, on the price reverse and close above the UBB, the two bands give a green light for going long. The steady trend that followed perfectly illustrates the power of the Bollinger Bands when used as a volatility measurement indicator.
As for the exit, look for a minimum of two candlesticks to close below the MBB. This is enough to close the trade. Naturally, in a short trade, look for a minimum of two candlesticks to close above the MBB before deciding that the trend is over.
For a short trade, the setup looks similar to the one described above. If the price had continued to the downside after it closed below the LBB, the Bollinger Bands would have widened enough to justify a short entry.
Keep in mind that volatility usually tends to slow down ahead of important market release. But before deciding to go long or short, wait for a candlestick to close and check the distance between UBB and LBB against the volatility standard.
Conclusion
Built on the desire to bring something new to the technical analysis world, the Bollinger Bands indicator stands as one of the most popular (and reliable) indicators in every trading platform. Traders use it extensively both in trend trading as well as in measuring volatility.
Most technical indicators used today belong to an era before personal computers. Think of the Relative Strength Index (RSI), the Commodity Channel Index (CCI), or similar indicators we have covered in this academy. The Bollinger Bands is no different.
Other indicators appeared in the meantime: some good, some bad, some excellent. However, the information they provide is more or less similar in many ways. For this reason, it is recommended that any trading strategy use at most one trend indicator and one oscillator so that the chart is not overloaded with conflicting information.
This article showed how to make the most of the Bollinger Bands indicator, by describing its formula and how John Bollinger built it and by showing original examples on how to use it. As with any technical analysis aspect, without integrating a trading strategy with a money management system, traders will not achieve consistent results.
The strategies presented here work on any market (currency pair, index, commodity) and time frame (monthly, weekly, daily, etc.). To make the most of these strategies, the secret lies in the proper execution of all the steps described.
Our next topic in this trading academy covers moving averages—what they are, the types that exist, and, of course, trading strategies to use.